Archive

Monthly Archives: June 2014

I subscribe to the TastingTable which in a nutshell is an edgy free daily email-based publication that gives the inside scoop of the food & beverage culture – often divulging adapted recipes & techniques garnered by renowned chefs (from mostly around the country but also ex-pats such as the austere David Lebovitz). I highly recommend subscribing if you like reading about all things epicurean (& adding new food homages to your next travel destination). Not too long ago, the TastingTable sent out an article about cucumber ice cream from Allumette (a restaurant & bar located in the Echo Park neighbourhood of Los Angeles) – I’ve never been, & likely never will since it’s going to close its doors in a couple of days. Such is the life of restaurants – lively yet short-lived & fleeting at times.
But I digress.cucumber basil ice cream
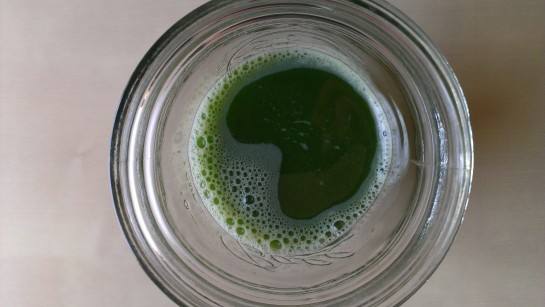
Cucumber. Ice Cream. Often times when cucumber is utilised in food – one thinks of salads, cucumber tea sandwiches, maybe even gazpacho – or even a further tangent, in cocktails: cucumber gin & tonic. Or some other sort of refreshing beverage combination (cucumber mint spritzer, etc). But in dessert? Perhaps cucumber sorbet – no further than that. This is why the article intrigued me, because why not? Cucumbers definitely have a distinct flavour. Creamy cucumber icecream? Sounds good to me! Reading the recipe; it also seemed insanely simple: juice some Persian cucumbers, whisk the strained juice with heavy cream, evaporated milk, sweetened condensed milk & salt. Cover & leave in the fridge for a couple of hours & you are ready to churn the ice cream base. The original recipe yields 2 quarts; which for a household of two adults – that is A LOT of ice cream. . Also, being who I am; I couldn’t resist modifying the recipe. I wanted to give the cucumber ice cream an extra dimension of flavour: herbaceous summery basil. What I did instead, was set aside the heavy cream & muddled it with fresh basil leaves. While the cucumber juice (which by the way; has the most incredible vibrant emerald hue that I’ve fallen in love with) melded with the evaporated & condensed milk – I allowed the basil to infuse the cream overnight covered in a separate container. I then ran the basil-infused cream through a sieve & whisked it with the rest of the ice cream base: ready to be churned in your ice cream maker. Easy enough, right? I must also say; it has a wonderful dense-enough texture for being egg-less. It’s quite substantial (must be cos of the three different types of dairy). This is not a wimpy ice cream – it is definitely decadent & worthy of any summer barbecue!
persian cucumber juice
Cucumber Basil Ice Cream
Yields 1 quart | Requires an ice cream maker – have your ice cream maker bowl chilled in your freezer before you embark upon this recipe to make life easier!
{ based on Miles Thompson’s Cucumber Ice Cream recipe via the TastingTable }

½ C organic Persian cucumber juice (from approximately 4 cucumbers, depending on size)
1½ C evaporated milk
1¾ C sweetened condensed milk
1¼ t sea salt
1 C organic heavy cream
½ C fresh organic basil leaves (torn) < one can easily substitute this with fresh mint as well or just omit the herbs altogether >

1. Prepare half a cup of Persian cucumber juice by using your juicer or blender to purée the cucumbers whole – double strain to ensure that the cucumber pulp is removed.
If you truly love cucumber & can’t bear to have the pulp (which is full of fibre & nutrients) go to waste – you can throw it into a fruit smoothie. The vegetal taste is rather subtle & it just adds to the body of the smoothie.
2. Whisk the cucumber juice with the evaporated milk, condensed milk & sea salt. If you would rather straight cucumber icecream; whisk in the heavy cream as well.
3. However if you want to do the basil (or mint) infusion: muddle the leaves into the heavy cream & set aside in the fridge to steep, covered overnight. I decided that muddling it would be the best way to go about it; because if you didn’t know – basil leaves tend to oxidise (aka turn brown) unless it is emulsified with fat/oil. The milk fat in the heavy cream is not enough to prevent the heavy oxidation (which would be the case if the basil leaves were food-processed with the heavy cream). However; if you desire a strong basil flavour & don’t mind a brown-tint to your ice cream.. By all means, blend away!
You could get away with having the cucumber juice, dairy & salt to meld in the fridge for a couple of hours if you are short on time. However keep in mind; the longer the ice cream base melds, the better the flavours will come through.
4. When you deem the ice cream base ready – pour your ice cream base into your chilled ice cream maker bowl & proceed to churn! This will take about 20-30 minutes. Check for a thick soft-serve consistency & transfer it into a preferably chilled container, cover it airtight & put it in the freezer for at least an hour before serving. I like to save some of the smaller basil leaves to garnish my ice cream scoops. & if you are adventurous; I highly recommend a drizzle of aged balsamic vinegar right on top. It gives it just a bit of extra acidity to cut the creaminess of the ice cream. Just unbelievably good. I intend on making this for many-a-summer to come.

& if cucumber ice cream isn’t your thing – I have to share one of my favourite sodas of all time. DRYSoda (a Seattle company) has a cucumber soda that is deliciously refreshing. It’s got just a hint of sweetness (only 11g of cane sugar as opposed to the usual 36g of high fructose cane-syrup from other carbonated soda companies). It only has four ingredients & is kosher, gluten-free, sodium-free, caffeine-free. DrySoda has a beautiful array of flavours (11 in all!) & aside from cucumber – I really enjoy their ginger, rhubarb, lavender, pear & lemongrass (well… when they did have lemongrass.. it’s been discontinued.. as you can guess, I’ve been a fan of DRYsoda for years now). The product line is lovely & sophisticated – they pair well with food & are versatile as mixers (speaking from experience – a splash of gin + cucumber DRYsoda is a winning combo). They’ve launched nationwide, so you are sure to find them in any Kroger, Safeway, QFC, Ralph’s, WholeFoods, Sprouts, Pharmaca, etc.

Thanks for reading my tangents on cucumber…
Happy summer, everyone!

Image
Happy Summer Solstice everyone!

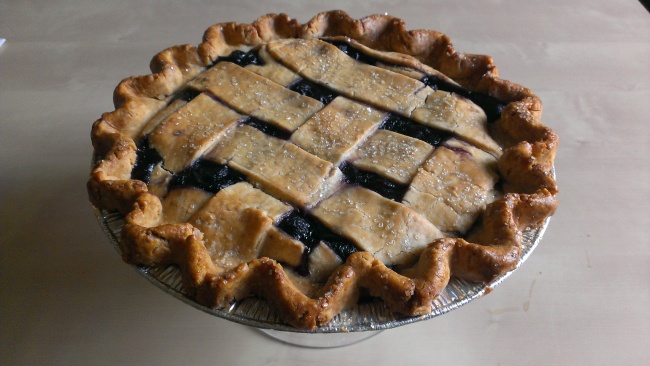
In wake of recent changes – but most importantly to celebrate my husband’s victorious accomplishment: graduating summa cum laude with his MFA in 2 years (this degree typically takes a 3 years to finish) – I made a 9″ gluten-free blueberry pie. Various family members flew down to see the graduate degree hooding commencement ceremony (thank goodness it was indoors & also, only for people who have earned their Master’s or Ph. D’s!). After the ceremony; we had a simple but delicious barbecue at our apartment – with the crowning treat being this pie! Quite a few of us couldn’t do gluten so I thought that I’d utilise my pie-making skills & make a gluten-free pie. For those who don’t have a lot of pie-making experience; I will say that making it with gluten-free ‘flour’ is a test of patience.. but definitely feasible! & worth it.

Fruit pies (particularly the berry-kind), truly herald a celebratory sentiment & that summertime has truly arrived! An unfortunate aspect of baked fruit pies is that if the filling is underbaked – it is thusly watery. & a watery pie is a disappointing pie to have indeed. To prevent the pie filling from being watery; I cook down the pie filling in advance so that it thickens quite nicely once it is baked. I usually make the filling the night before assembling the pie (if you are in a pinch for time, you can easily get away with making the filling a few hours before, especially if you chill the filling quickly. It also goes without saying, you can also make the filling days in advance if you wish).

BLUEBERRY PIE FILLIN’
<enough to fill one 9″ pie; I know it seems like a lot of filling but believe me, it will cook down & fill your 9″ pie shell quite easily>
1 # 4 oz of blueberries (frozen, if fresh is unavailable)
2 T of gluten-free all-purpose flour (you can substitute cornstarch, if that is what you have on hand)
3 oz of granulated sugar
zest of 1 lemon
2 T of lemon juice
1/2 t of sea salt

Toss the above ingredients & combine into a saucepan. Put it on medium heat until it simmers. Lower the heat to a continual simmer; allowing the berries to cook through. Be sure to stir occasionally throughout. If the bottom of the saucepan sticks, lower the heat & continue stirring. When the mixture thickens, remove from heat & transfer to a heatproof bowl & allow to cool. Be sure to refrigerate the filling before using it (warm filling onto pie dough would be disastrous).

The pie dough. I used Bob’s Red Mill’s Gluten-Free All-Purpose Baking Flour & modified this recipe.
The result was satisfactory! It had a nice flaky crunch to it (probably due to the use of the pastry blender & the cold pats of butter I put in it). My husband didn’t realise that the pie was gluten-free & in fact, he thought that the pie was fantastic. So have that, you anti-gluten-free-baking naysayers!

GLUTEN-FREE PIE DOUGH
<enough for one 9″ latticed or double-crusted pie / or two 9″ single-crusted pies>
1 1/2 C gluten-free all-purpose baking flour
1 T granulated sugar
1/2 t sea salt
1/2 C unsalted butter (very cold, cut into cubes or little slabs)
4 T almond milk (or any sort of ‘milk,’ almond milk just happens to be what I had on hand at the time)

In a large bowl, combine the dry ingredients (flour, sugar & salt). Using a fork or a pastry blender, quickly cut the cold butter into the dry; until it has the consistency of coarse wet sand. Pea-sized clumps of butter is permissible; sometimes I use my fingers to break them up further & incorporate them into the mixture. At this point, forgo the fork or pastry blender and incrementally incorporate the almond milk until just combined. Be careful not to over do it; we just want a cohesive mass (but not to the point where it’s just one big hulking pliable piece). Divide the dough in half; flatten onto waxed paper (or even plastic wrap) into disks. Either use plastic wrap to cover them or stick them into zip-lock gallon bags. Lay the covered or sealed disks of pie dough onto a flat surface in the fridge to chill for about an hour before using.

ASSEMBLING
Be sure to have an ample amount of workspace for assembling your pie! Also, I hope you have some excess gluten-free flour to use because without it; assembling this pie will be an incredible test of your patience.
You will need a rolling pin, your pie tin or dish, a bench scraper, your pie filling & the pie dough disks. It is imperative that once you take the dough out of the refrigerator – that you work quickly with it. Flour your work surface; carefully and evenly roll out one of the disks into a quarter-inch thick circle. Be sure to alternate sides of the disk, so that you can roll out the dough out evenly. However the caveat is that if you flip the pie dough circle-to-be too often, it may crack (since there is no gluten to bind the dough together). Lay your sufficiently rolled pie dough circle onto your pie tin or dish; pressing it into the sides and bottom of the tin/dish. If you are having trouble with cracks; just gently press the surrounding dough, smoothing it (thus repairing) into the crack. This is only the bottom of the pie & no one is going to stop to examine the pie’s bottom! The pie dough bottom is now ready for the filling! Evenly fill the pie shell. If you are wanting to do a lattice topping on your pie – roll out the remaining pie dough disk into a quarter-inch thick square or rectangular shape. Using your bench scraper, cut even strips of pie dough & carefully lay them on top of the filled pie shell. Interlace them if you’d like. For the excess pie dough ends of the strips, pinch them onto the bottom pie shell; forming an edge; going around the top rim of the pie tin or dish. With any excess pie dough pieces; I would pinch them off and mold them onto the uneven parts of the pie crust edge… Can I just add that describing this is much more difficult than simply demonstrating it? If you’ve never formed a pie shell before; it takes a lot of practice (to the point where it gets intuitive!) I highly recommend Youtubing a pie shell forming demonstration… But if you prefer a ‘rustic’ pie; free-form all you want! Anyhow; once you are satisfied with the assembly of your pie; refrigerate your pie until it is time for it to go into the oven. I prefer to bake pie hours before it is served (fresh is best!). Also, your kitchen/home will just smell HEAVENLY.

BAKING
Preheat your oven to 375ºF. Once the oven is almost to temperature; use a pastry brush to brush cream (half & half, milk, whatever you may have) onto the top of the pie, getting into the lattices. Then sprinkle it with coarse sugar (I use turbinado; not only for aesthetic reasons but it adds a fantastic crunch). Then place the pie onto a baking sheet and bake for 45 minutes. After 45 minutes, I rotate the pie and bake it for another 10 minutes or accordingly. When checking for done-ness, I look at the blueberry filling – if it is slowly oozing out of the lattice like a thick molasses; that is my cue that it is ready to leave the oven! The pie crust itself should also be a lovely golden (but barely brown) hue, cracking ever-so-slightly. Allow to cool for a couple of hours & it is ready to serve! Depending on how generous your servings are, it can feed up to 8. I only refrigerate pie when it is down to a couple slices. The pie does keep for at least 3 days at room temperature . . Though I have doubts that it would even last that long!

Image

My odd sense of humour compelled me to take this photo after an excited customer accidentally overturned her just-purchased mini red velvet cupcake. She was remorseful but I simply laughed & quickly gave her a new cupcake. For me, this picture encapsulated everything that was going on at the time - a very pivotal moment during a time of chaos. A casualty in the realm of larger forces in opposition . . a reminder that the culmination of time/energy/effort, even with the best intentions, can go awry . . That there are always aspects of the situation out of one's control. Therefore you could either choose to be upset & angry or you could just laugh at the absurdity. & carry on. (I am hopeful that I am sounding existential & optimistic rather than not.) Happy June, everyone! Can you believe that this year is almost halfway over? What a whirlwind!

Life at Kobo

Artisan gallery and design shop in Seattle, WA

True Story

Part of me wants to spare you the details. Part of me wants to tell you everything.

729 layers

recipes and stories from my kitchen

Pizzeria Gabbiano

A topnotch WordPress.com site

Le Nomade

The Journal & Journey of a Chef

Pasteria Lucchese

Artisan Pastas, Sauces & Desserts

Jim Drohman

. photography, musings, recipes & tea

A Bread A Day

. photography, musings, recipes & tea

The Bittman Project

. photography, musings, recipes & tea

Sugimoto America Blog

. photography, musings, recipes & tea

Jeannie Huang

. photography, musings, recipes & tea

David Lebovitz

Baking and cooking recipes for everyone

Breakaway Cook

. photography, musings, recipes & tea

Jamie Oliver

. photography, musings, recipes & tea

A Plum By Any Other Name

. photography, musings, recipes & tea

Fat of the Land

. photography, musings, recipes & tea

Orangette

. photography, musings, recipes & tea

Nordljus - Food & Photography

. photography, musings, recipes & tea